User manual
This manual depicts all the user interaction with the desktop app itself. Manual consists of App installation, Types of windows and all their functionalities and App settings (types of settings and their effects on the application runtime)
Table of contents
App installation
Note
Currently, project does not have any builds, the main desktop app is now in early development and many features are not done yet. However, you’ll soon be able to see releases at SEDAS github Releases.
Name |
Status |
Note |
|---|---|---|
Ubuntu 24.04 |
Release not available |
|
Ubuntu 22.04 |
Release not available |
|
Arch Linux |
Release not available |
|
Windows 11 |
Release not available |
|
Windows 10 |
Release not available |
|
MacOS |
Release not available |
- Working on distro
- Some issues are present
- Failing on distro/Not released yet
Note
All the build steps were tested for Linux distros, so the actual build instructions for Windows would probably differ significantly.
Setting up repository
git clone --recursive https://github.com/SEDAS-DevTeam/SEDAS-manager.git
cd SEDAS-manager
Setting up Python virtual environment
I recommend using pyenv for setting up project helper (for managing building, compiling, etc.), but if you are more familiar with conda, there is no problem of using that.
All the project helper dependencies are in requirements.txt
pyenv install 3.11 # install python3.11
pyenv virtualenv 3.11 sedas_manager_env
pyenv local sedas_manager_env # Switches to environment
pip install -r requirements.txt # install depedendencies
Note
This local setup created a .python-version file inside your workspace. It helps pyenv determine what virtual environment to activate.
So basically you don’t need to do the activation/deactivation.
Setting up Node.js environment
This projects uses nvm (Node Version Manager, installation link) for the Node.js version managing, so that the project could stay mostly up to date. I recommend using this for the standard setup.
Currently, the project uses the latest LTS version (v22.14.0), in order to set up environment correctly, you have to take steps below:
nvm install # to install LTS version from .nvmrc file
npm install -g npm@latext # ensure the latest version of npm
The Node.js environment is now set up. The invoke commands will automatically switch to version specified in .nvmrc.
Install npm dependencies
npm install
npm install -g node-gyp # to enable addon compilation
Note
Currently, Ubuntu 24.04 implemented the new AppImage restrictions, so that users cannot run Electron apps sandboxed (github issue). The temporary workaround is below:
sudo sysctl -w kernel.apparmor_restrict_unprivileged_userns=0 # deactivates the restriction
sudo sysctl -w kernel.apparmor_restrict_unprivileged_userns=1 # activates the restriction
Check any updates from submodules
invoke update # this will also check requirements.txt if any dependency is missing
Compile C++, TS and node-addon-api files
invoke compile
Run app in development mode
invoke devel app # to run the app in development mode
invoke devel install # to run the installer in development mode (for testing, installation is turned off)
invoke devel uninstall # same but for the uninstaller script
Everything should be set up for now :).
Note
Add windows build instructions
Note
Add MacOS build instructions
Toolkit enables developer to build and publish a binary locally. This feature is only for users who want to contribute and be part of the active development. So there are definitely going to be some changes regarding this part.
invoke build # executes app build
invoke publish # executes app publish to github
Note
Difference between publish and build commands is that publish also publishes the binary to Github. So you dont need to run build before publishing.
Note
The publishing wont work right now. You would need to be authorized and have access to the organisation which is not possible for now because many aspects needs to be tweaked in the future.
This part is entirely optional. It is just here to show people who want to take part of the development how to setup other SEDAS repositories as well.
This module is already being built inside the SEDAS-manager as a submodule. So practically there is no need to build it yourself. But if you want to take a part in the SEDAS-AI-backend development, you can follow these steps:
Setting up the repository
git clone --recursive https://github.com/SEDAS-DevTeam/SEDAS-AI-backend.git
cd SEDAS-AI-backend
Setting up Python virtual environment
pyenv install 3.11 # install python3.11
pyenv virtualenv 3.11 sedas_backend_env
pyenv local sedas_backend_env # Switches to environment
pip install -r requirements.txt # install depedendencies

cd src # switch to working dir (where the tasks.py is located)
Fetching all the ASR/TTS model resources
invoke fetch-resources
Note
Be aware that this would probably take some time. The helper needs to fetch an ATC-whisper binary from huggingface repository and also some TTS binaries from the Piper web resource.
Building whisper.cpp dependency
invoke build-deps
Note
This step would also take some time, the whisper.cpp needs to build a wrapper that will invoke ATC-whisper model at the simulation start. So if you are compiling the CUDA version (that is set by default) this process will probably take some time.
Building the whole project
For testing
# for running a test
invoke build --DTESTING=ON
invoke run test
For the test executable, you can control the ASR and TTS just by using a keyboard invokes (i. e. the a key for the start/stop of recording and q key for killing the entire program).
For integration
# to test the actual executable that is going to be integrated in SEDAS
invoke build --DTESTING=OFF
invoke run main
For the main executable, in order to test the communication, you have to run another script on different terminal window (this is because the integration script communicates using socket communication on a specific port 65 432).
invoke test-main # runs the "commander" script that controls the "main" one
Note
Unfortunately, the main executable currently communicates on a specific port that is not changeable.
This will definitely change in future
The test-main script usage:
register  [callsign (string)] [noise-intensity (float)] # registers a pseudopilot to communicate with user (write without brackets)

start-mic # starts mic recording
stop-mic # stops mic recording

#
# Do some communication here using start-mic or stop-mic
#

unregister [callsign (string)] # unregister/terminate a pseudopilot
quit # terminate the main program
This repository is currently only used for research purposes, so it is completely excluded from the whole SEDAS-manager pipeline. Normal user doesn’t need to build it, because sedas automatically fetches corresponding binaries from the huggingface repository. So follow this repo if you want to participate in the research and implementation for a better ASR model.
Note
Currently, ATC-whisper does not support training own custom whisper model, it just implements a conversion of whisper-ATC-czech-full (custom pretrained weights) into a
model in GGML format. But in the future, project will allow training custom models on the ATCOSIM and other datasets.
Setting up the repository
git clone --recursive https://github.com/SEDAS-DevTeam/ATC-whisper.git
cd ATC-whisper
Setting up Python virtual environment
conda env create -f environment.yaml
conda activate atc_whisper # use conda deactivate for env deactivation

cd src # get to working dir
Download resources
invoke download
# use: invoke download -t="repo" to download SEDAS-whisper huggingface repo
# use: invoke download -t="model" to download whisper-ATC-czech-full resources
Build whisper.cpp binary (just for testing the inference of whisper model)
invoke build
Note
Be aware that this is going to take some time, because whisper.cpp needs to build a whole whisper wrapper binary. Process can get much more lengthy if it is built with CUDA support (which is now by default).
Convert Pytorch binary to GGML binary
invoke convert bin-to-ggml
Testing inference
invoke run-infer
Uploading modified content to Huggingface (only works for authenticated users with their own token)
Token is saved to token.yaml in the root of the project (you have to create it yourself), the formatting is corresponding:
token: <your huggingface token>
To upload modified content, run this command:
invoke upload
Also not necessary for the SEDAS-manager user build, but If you want to contribute to SEDAS project, keep going.
Setting up the repository
git clone https://github.com/SEDAS-DevTeam/sedas-docs.git
cd sedas-docs
Setting up Python virtual environment
pyenv install 3.10 #install python3.10
pyenv virtualenv 3.10 sedas_docs
pyenv local sedas_docs # Switches to environment
pip install -r requirements.txt
pip install -r ./docs/en/requirements.txt # Install the sphinx requirements
Building documentation locally
invoke build en # for the english version (for others, supply other abbreviations: cz)
Creating own AI-powered translation
This documentation uses Meta AI M2M_418M encoder-decoder model for multilingual translation ([huggingface](https://huggingface.co/facebook/m2m100_418M)), works really well both on CPU and GPU. This method is highly experimental and be aware that it requires user intervention (manually translating some parts) afterwards.
invoke create-translation cs # for the czech version (as an example)
Note
Project is not built yet
Note
Project is not built yet
Note
Project is not built yet
Windows and their functionalities
Types of windows
Currently, these types of windows are utilized:
Settings
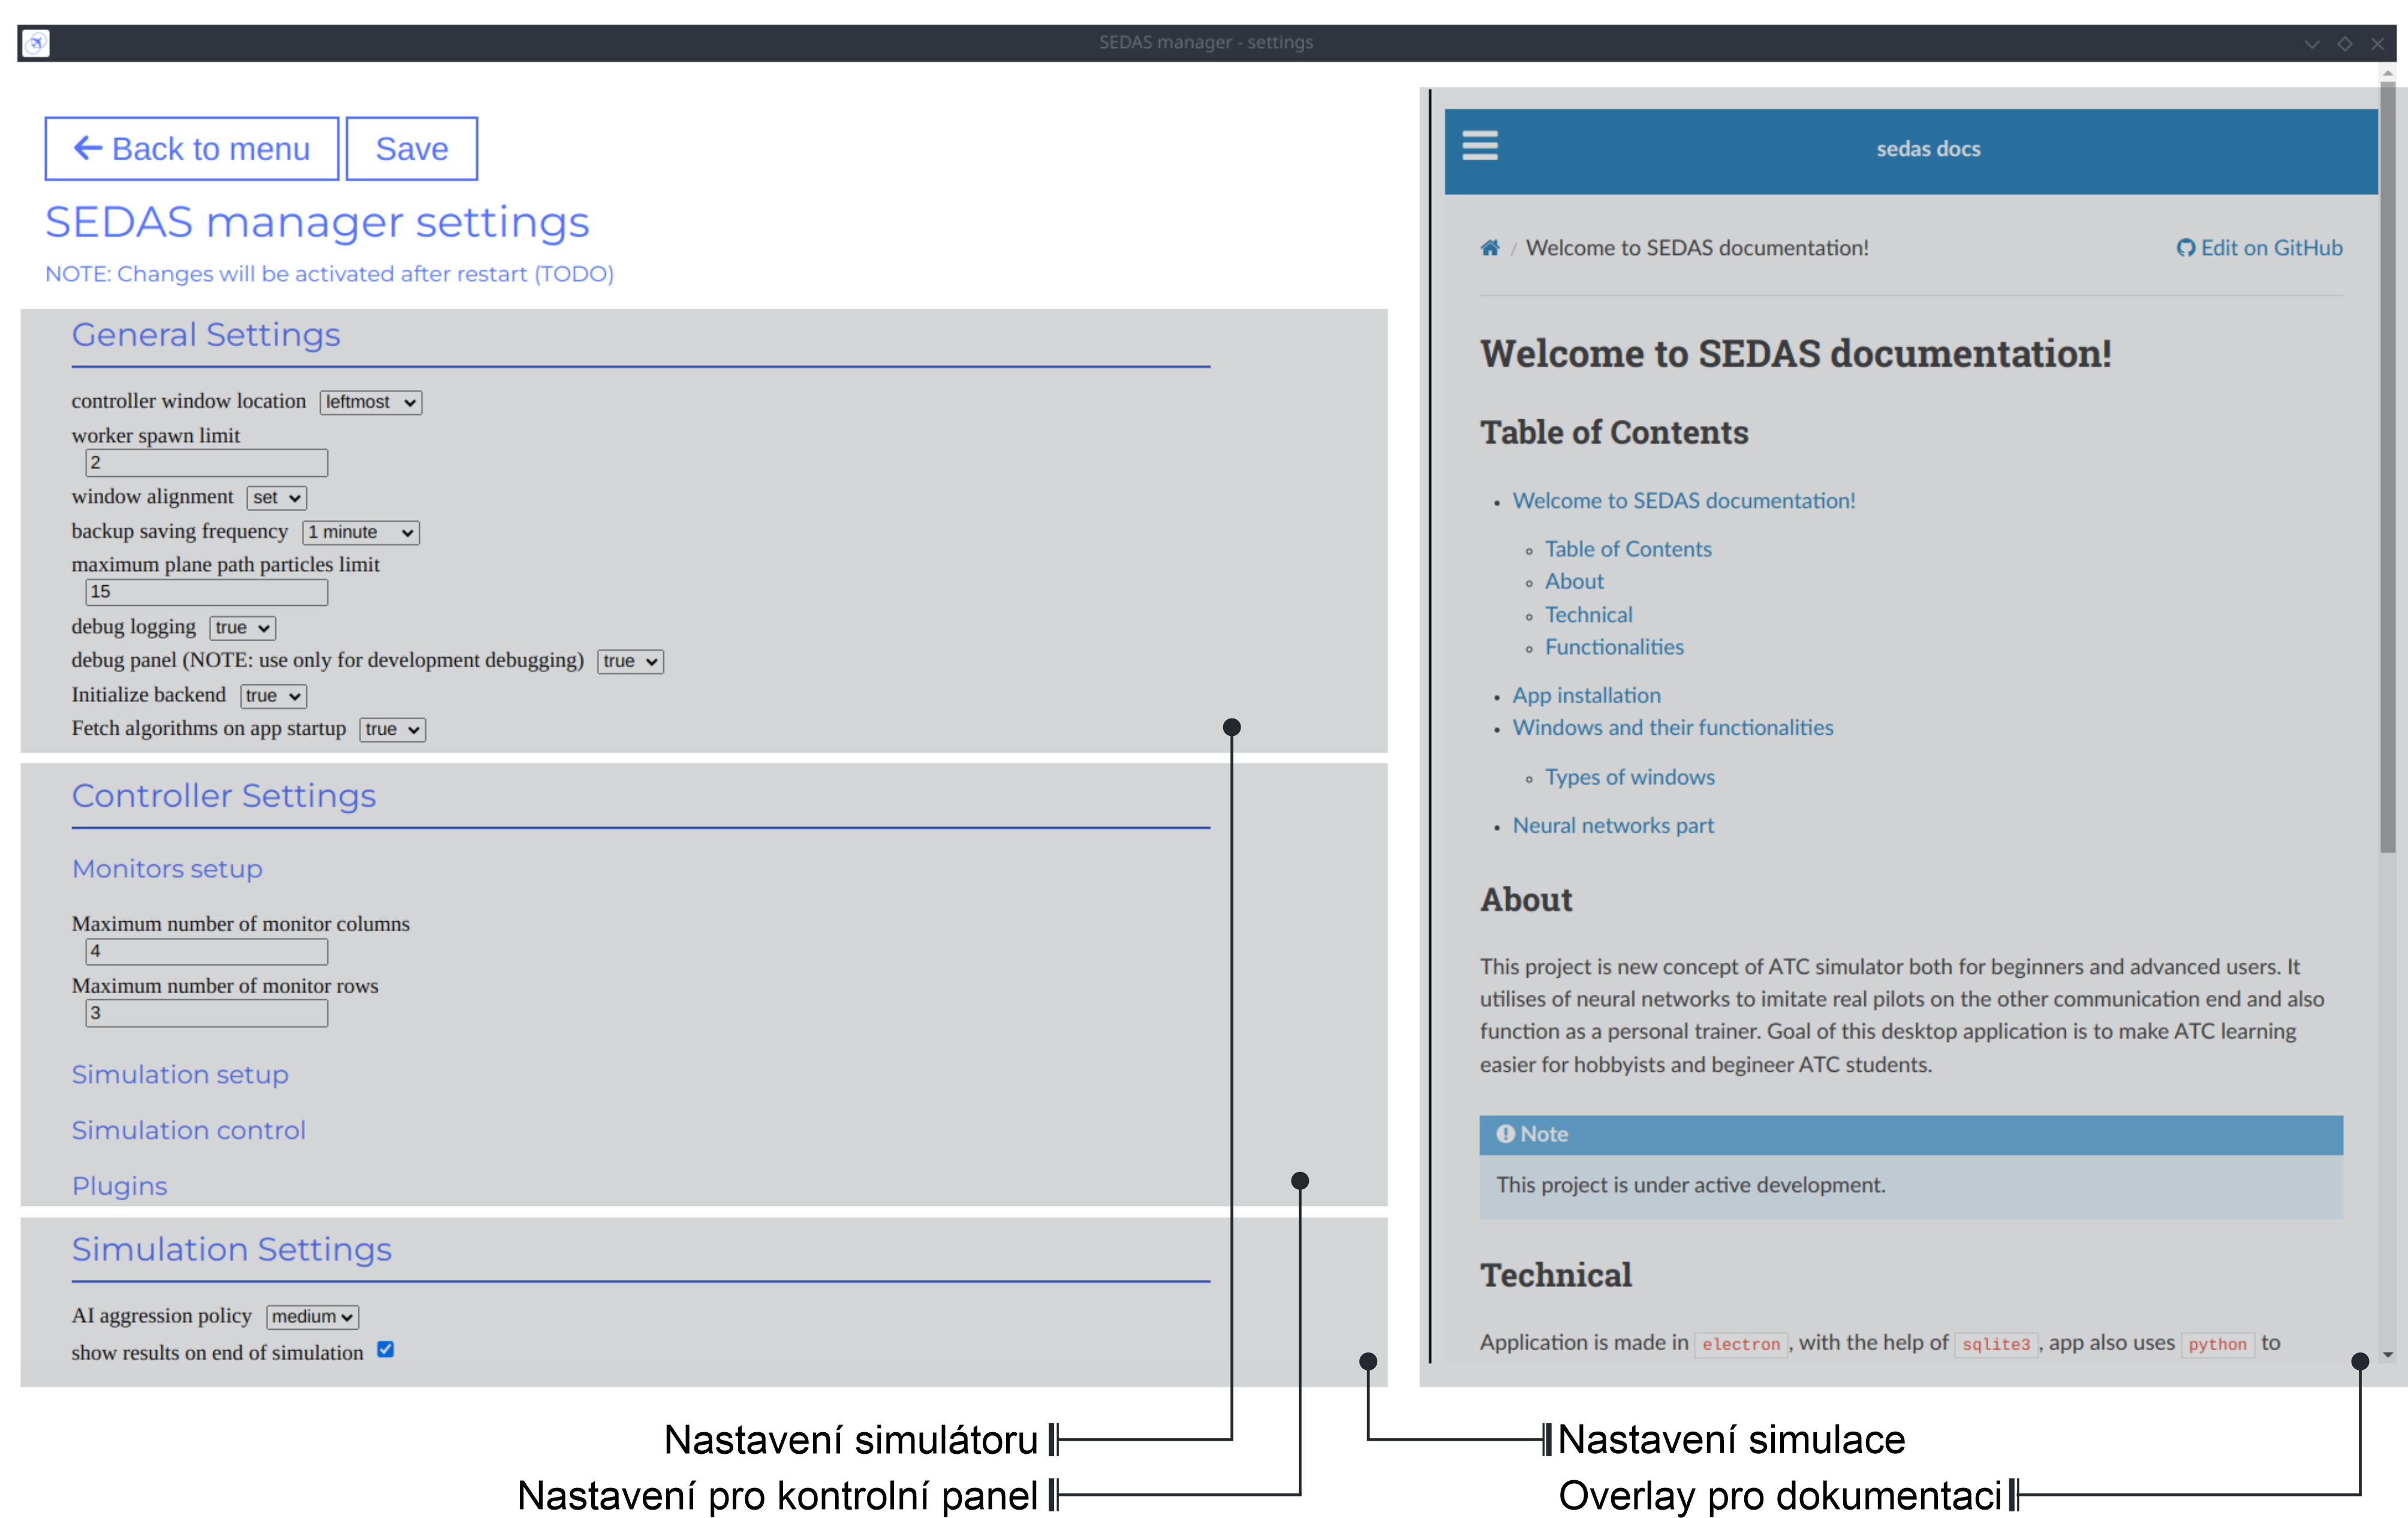
In the settings window, user can set up the basic simulator behavior. The window itself is separated into multiple categories. We have the general settings, which facilitate the general ATC simulator behavior. Then we have the Controller settings (i. e. the behavior of the ATCo windows) and the Simulation settings, which allow user to change some environmental aspects and also AI pseudopilot behavior.
Controller window
This is the most important window in the whole app. It categorizes user actions into multiple tabs (Setup, Simulation, Wiki, Monitors, Plugins) that are explained below. The documentation is formatted into different categories that explain specific window. Category order is similar to the order in Controller window.
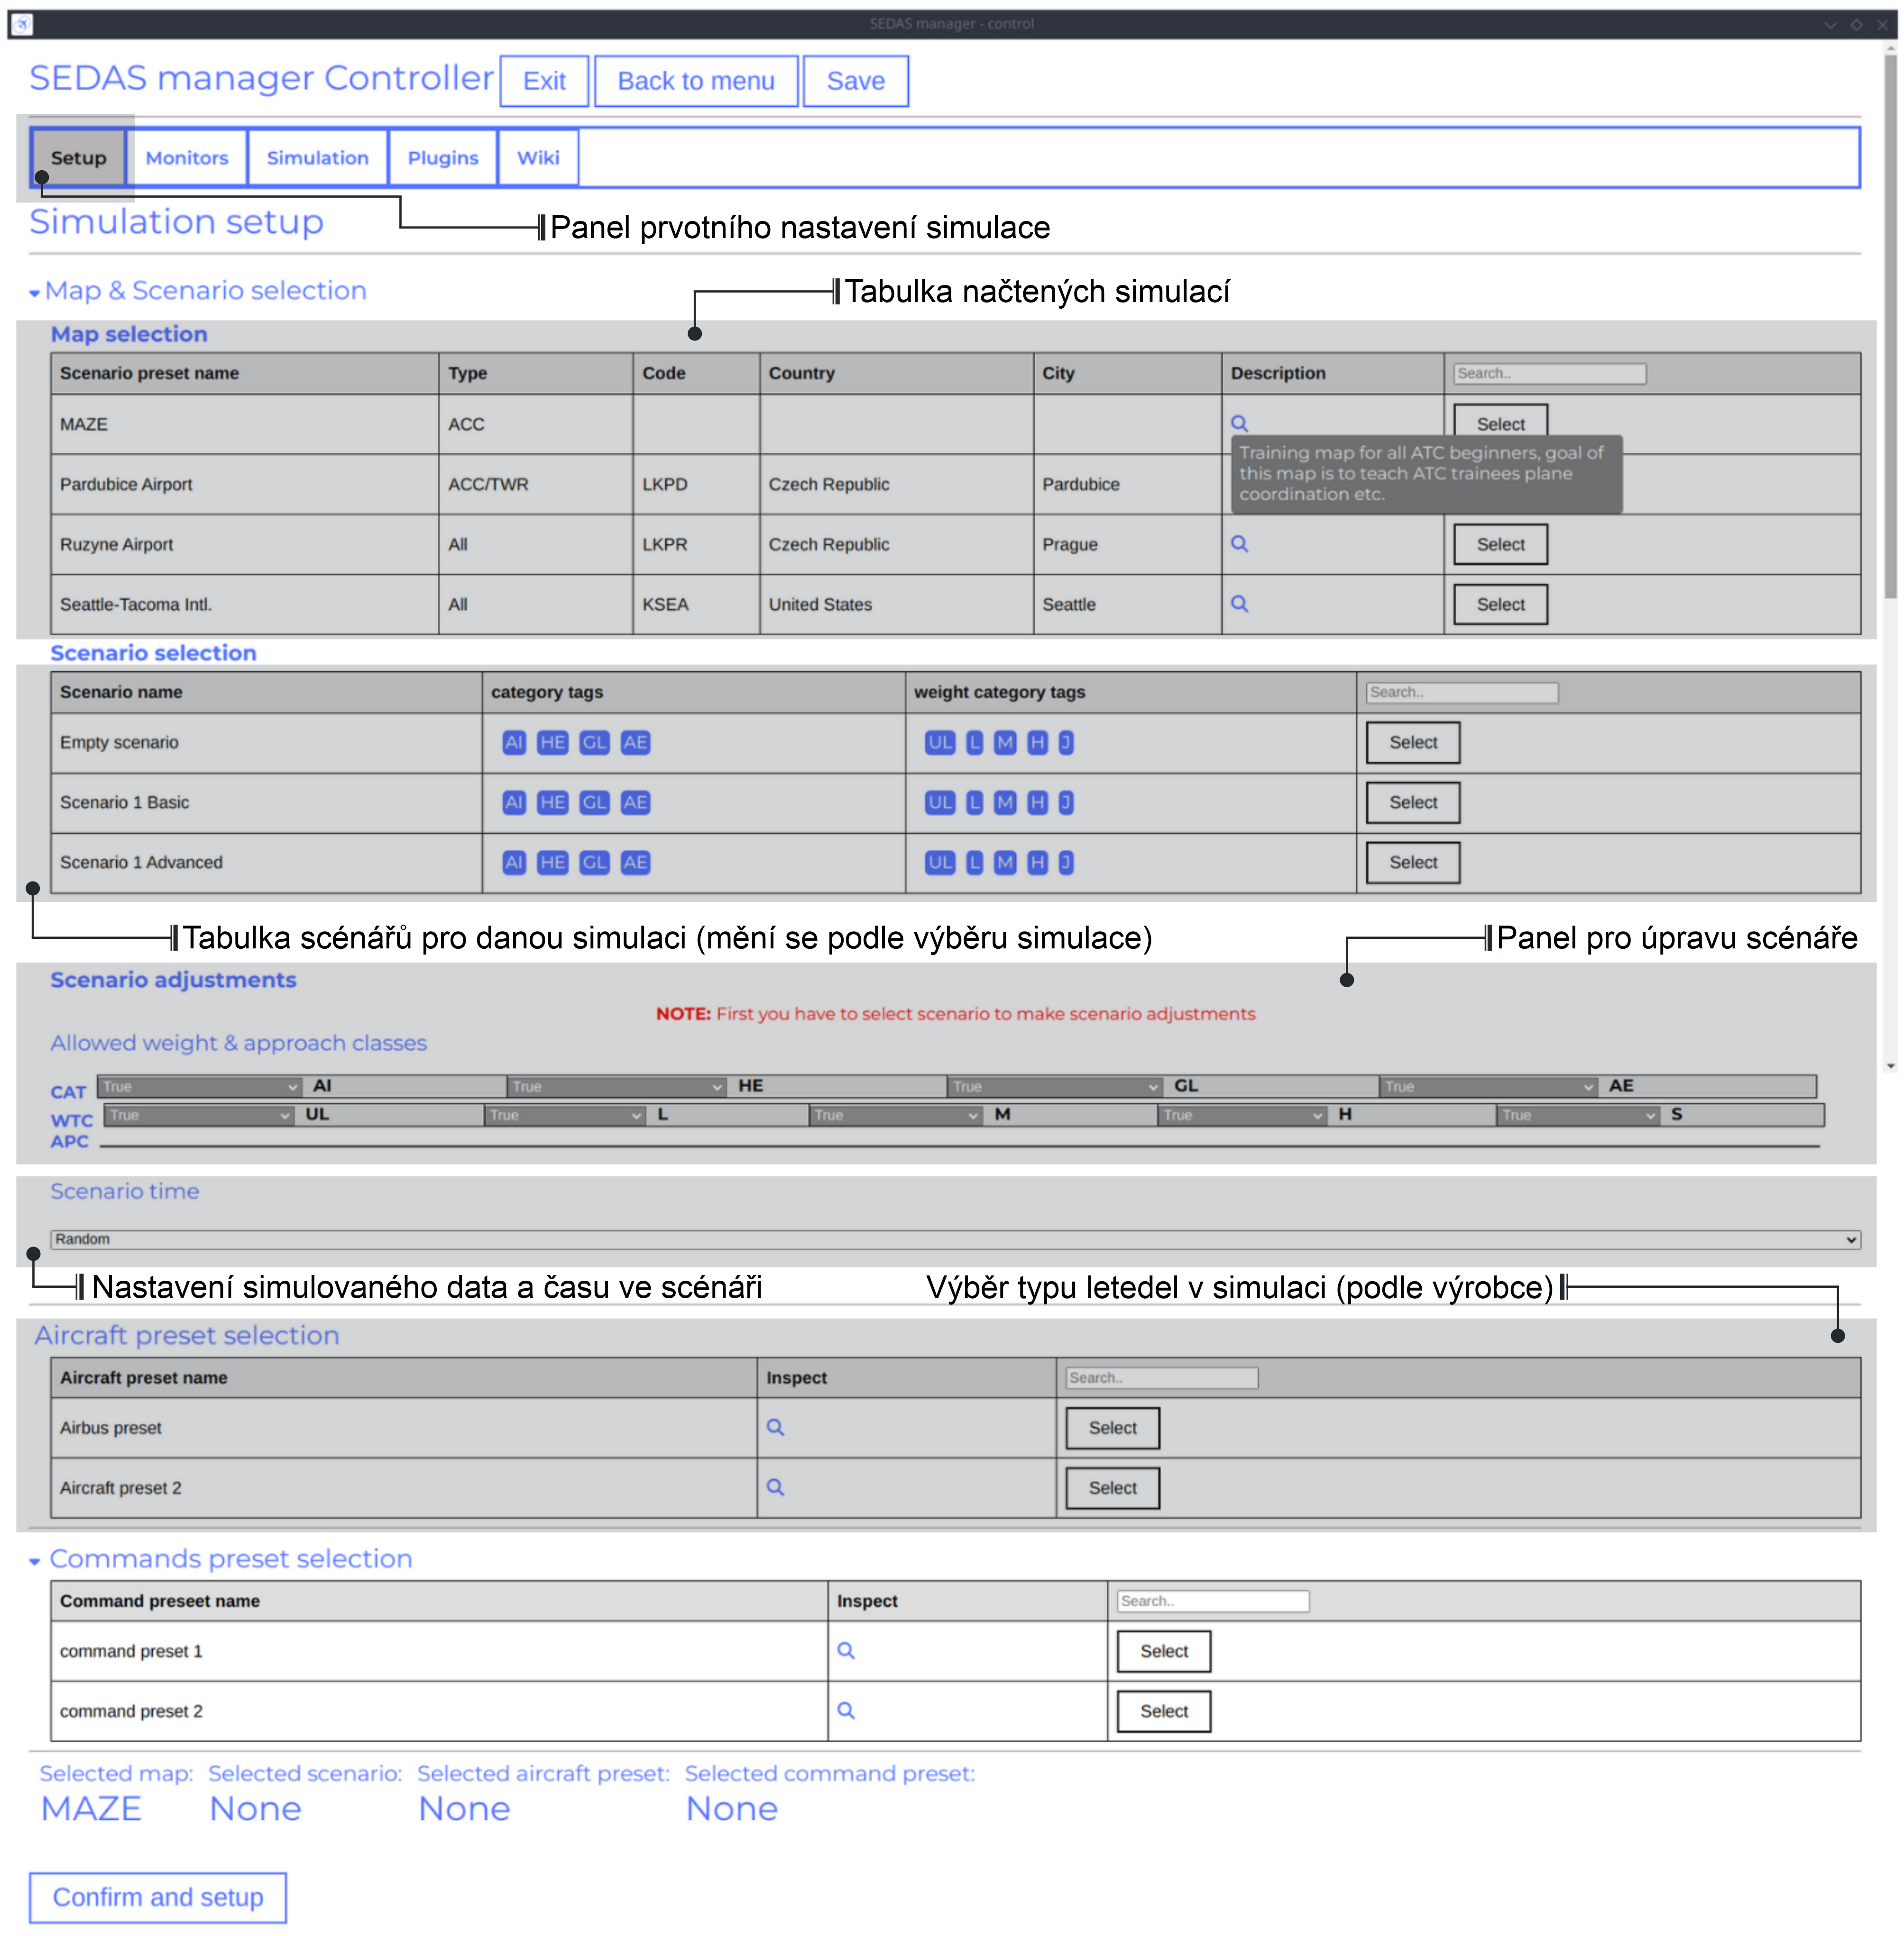
Controller Setup tab
The SEDAS simulations are divided into two categories: Planned and Unplanned.
Planned simulations
User can set up the planned simulations in the Setup tab, when they select Map (and corresponding scenario), Aircraft preset and Commands preset with aditional tweaks. After that, the simulation engine will determine and setup the simulation accordingly. Variables, that are tweakable by user, are explained below:
Map - here, user can select a specific map/airport that will be used in the simulation. Every map has its type according to ATC zone classification (ACC, TWR and APP). They also have designated ICAO airport code (if the map is designated as an airport), Country and City (could be left empty if the simulation doesnt redirect to actual place) and the description (also optional).
Scenario - Every map has its own predefined sets of scenarios, that define what plane types are going to be used in the simulation and also other key aspects (time of plane spawning, special situations). Every map has different scenarios.
Scenario adjustment - User can adjust selected scenarios. Currently, scenario adjustments just allow to exclude WTC (Wake Turbulence - ULtralight, Light, Medium, Heavy, J - Super) or CAT (aircraft category - AIrplane, HElicopter, GLider, AErostat) categories.
Scenario time - User can select the time of scenario (this setting is just aesthetic, so it could be left at random, which generates random time and date)
Aircraft preset - Allows user to select specific types of planes (planes from only one manufacturer, etc.). User can inspect the preset before selecting it.
Commands preset - Allows user to select specific commands that are going to be allowed in the simulation. Other commands are not going to be accepted by AI pseudopilots.
Note
Currently, the planned simulations are not working yet. This is because the implementation of the simulation setup engine is quite tedious and requires to set up a lot of rules and exceptions when implementing it. It is advised for the user to use Unplanned simulations path.
Unplanned simulations
Every map allows user to set every preset to empty. That means, that the simulation engine will be set to default and zero exceptions will be enforced upon the simulation. The simulation would be empty and only the selected map would be rendered. After that, user can freely spawn planes in the Simulation tab, so the simulation is directed by the user.
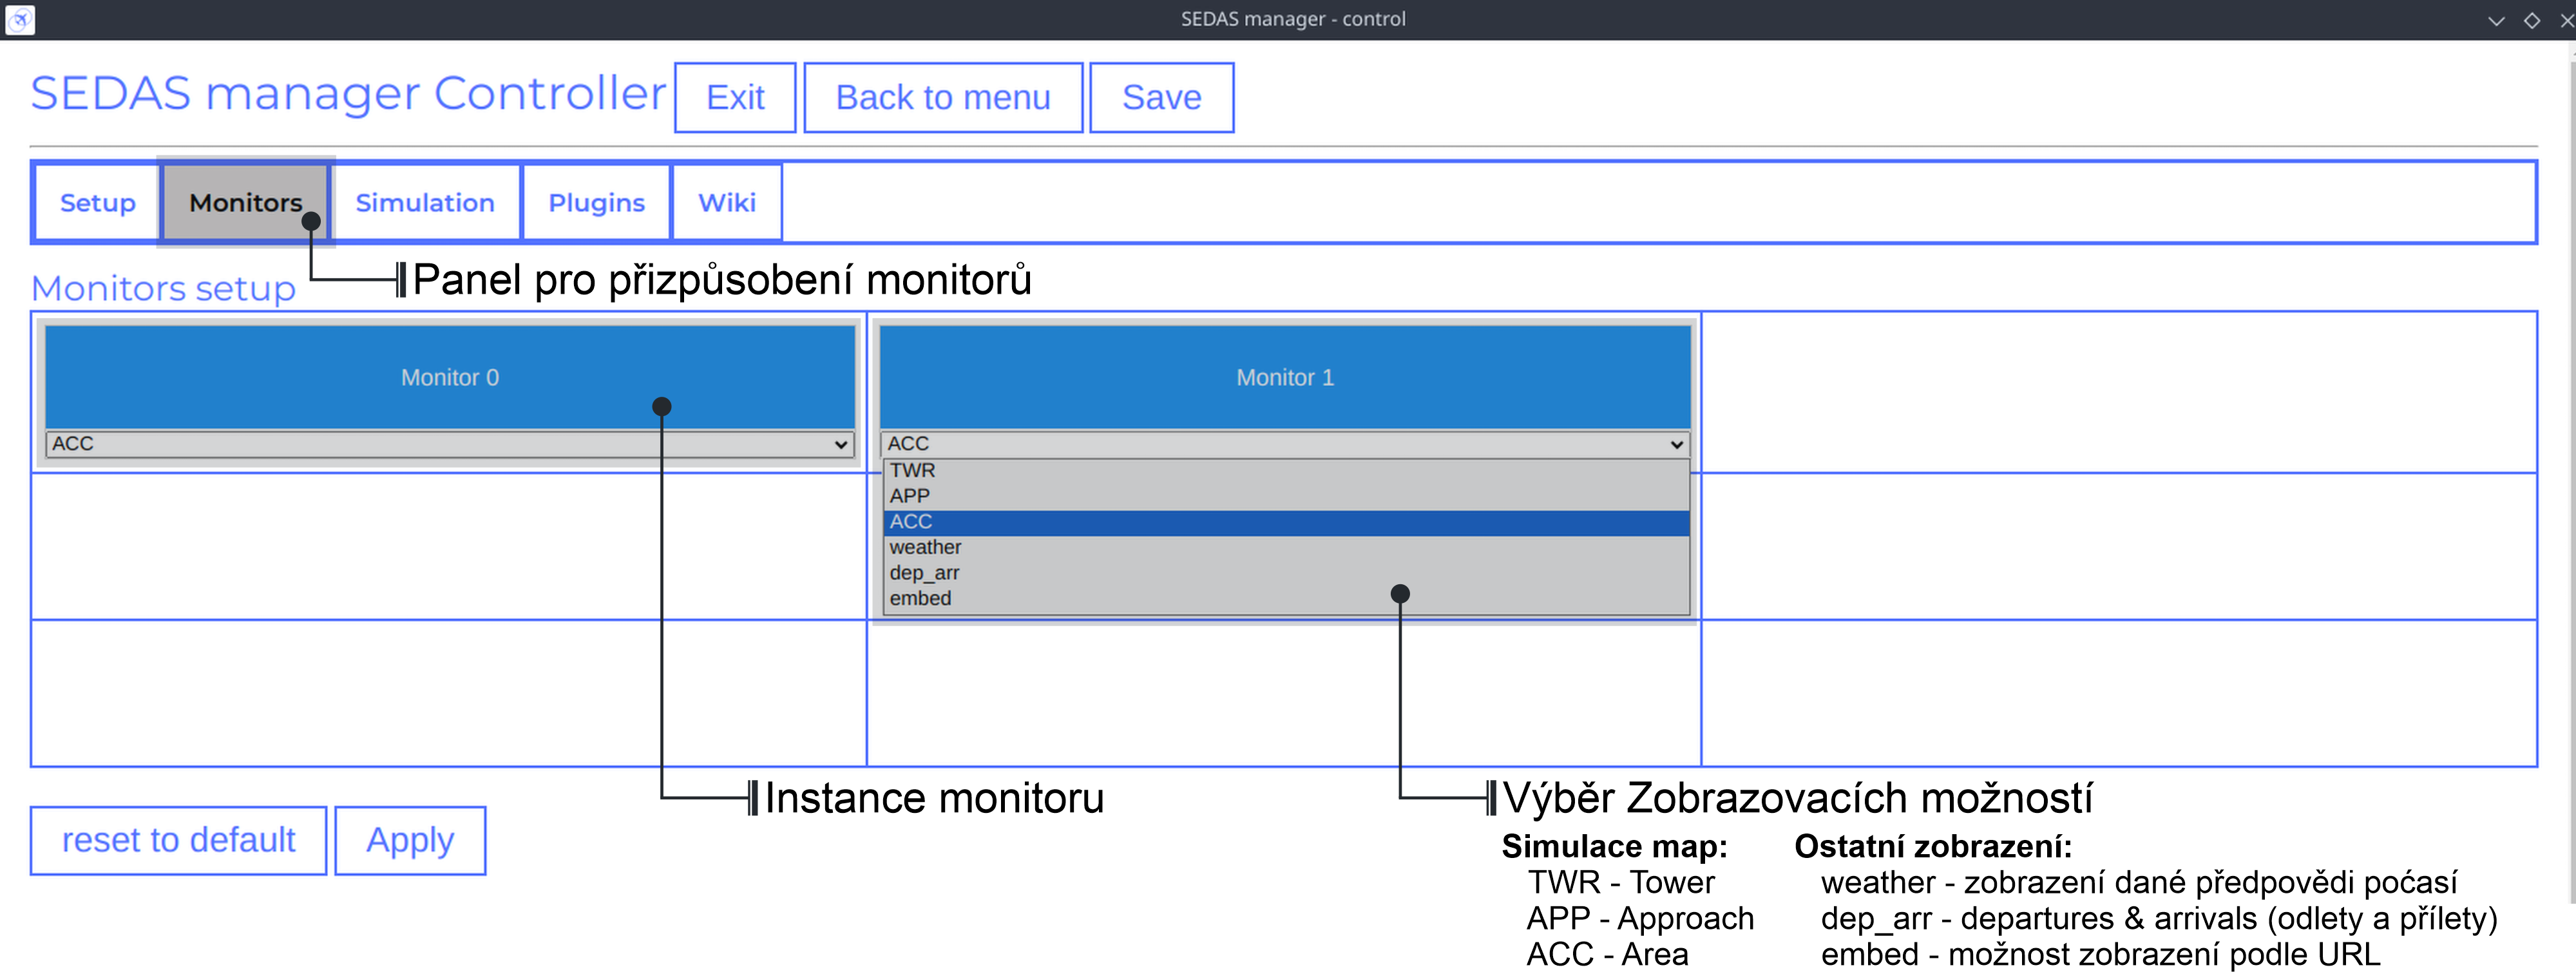
Controller Monitors tab
Simulator alows user to adjust multiple window instances. The app itself is designed to be working on multiple-monitor setup. The advised number of monitors is currently 2 (one for Controller tab, other fro Worker (ATCo) tab). However, app also works on just one monitor setup (the windows would be overlapping though). User can select what behavior could the specific window/monitor have. Options are listed below:
TWR - Tower view for the simulation (Map has to support TWR)
APP - Approach view for the simulation (Map has to support APP)
ACC - Area control view for the simulation (Map has to support ACC)
weather - Embeds weather data into simulation (Map has to point into specific place on the earth - Country and City tags cannot be empty when selected)
dep_arr - Departure/Arrival view for the currently activated planes.
embed - Allows user to embed external web resource from the URL.
Note
The configurations are not done yet. Simulator currently supports only ACC, weather and dep_arr view.
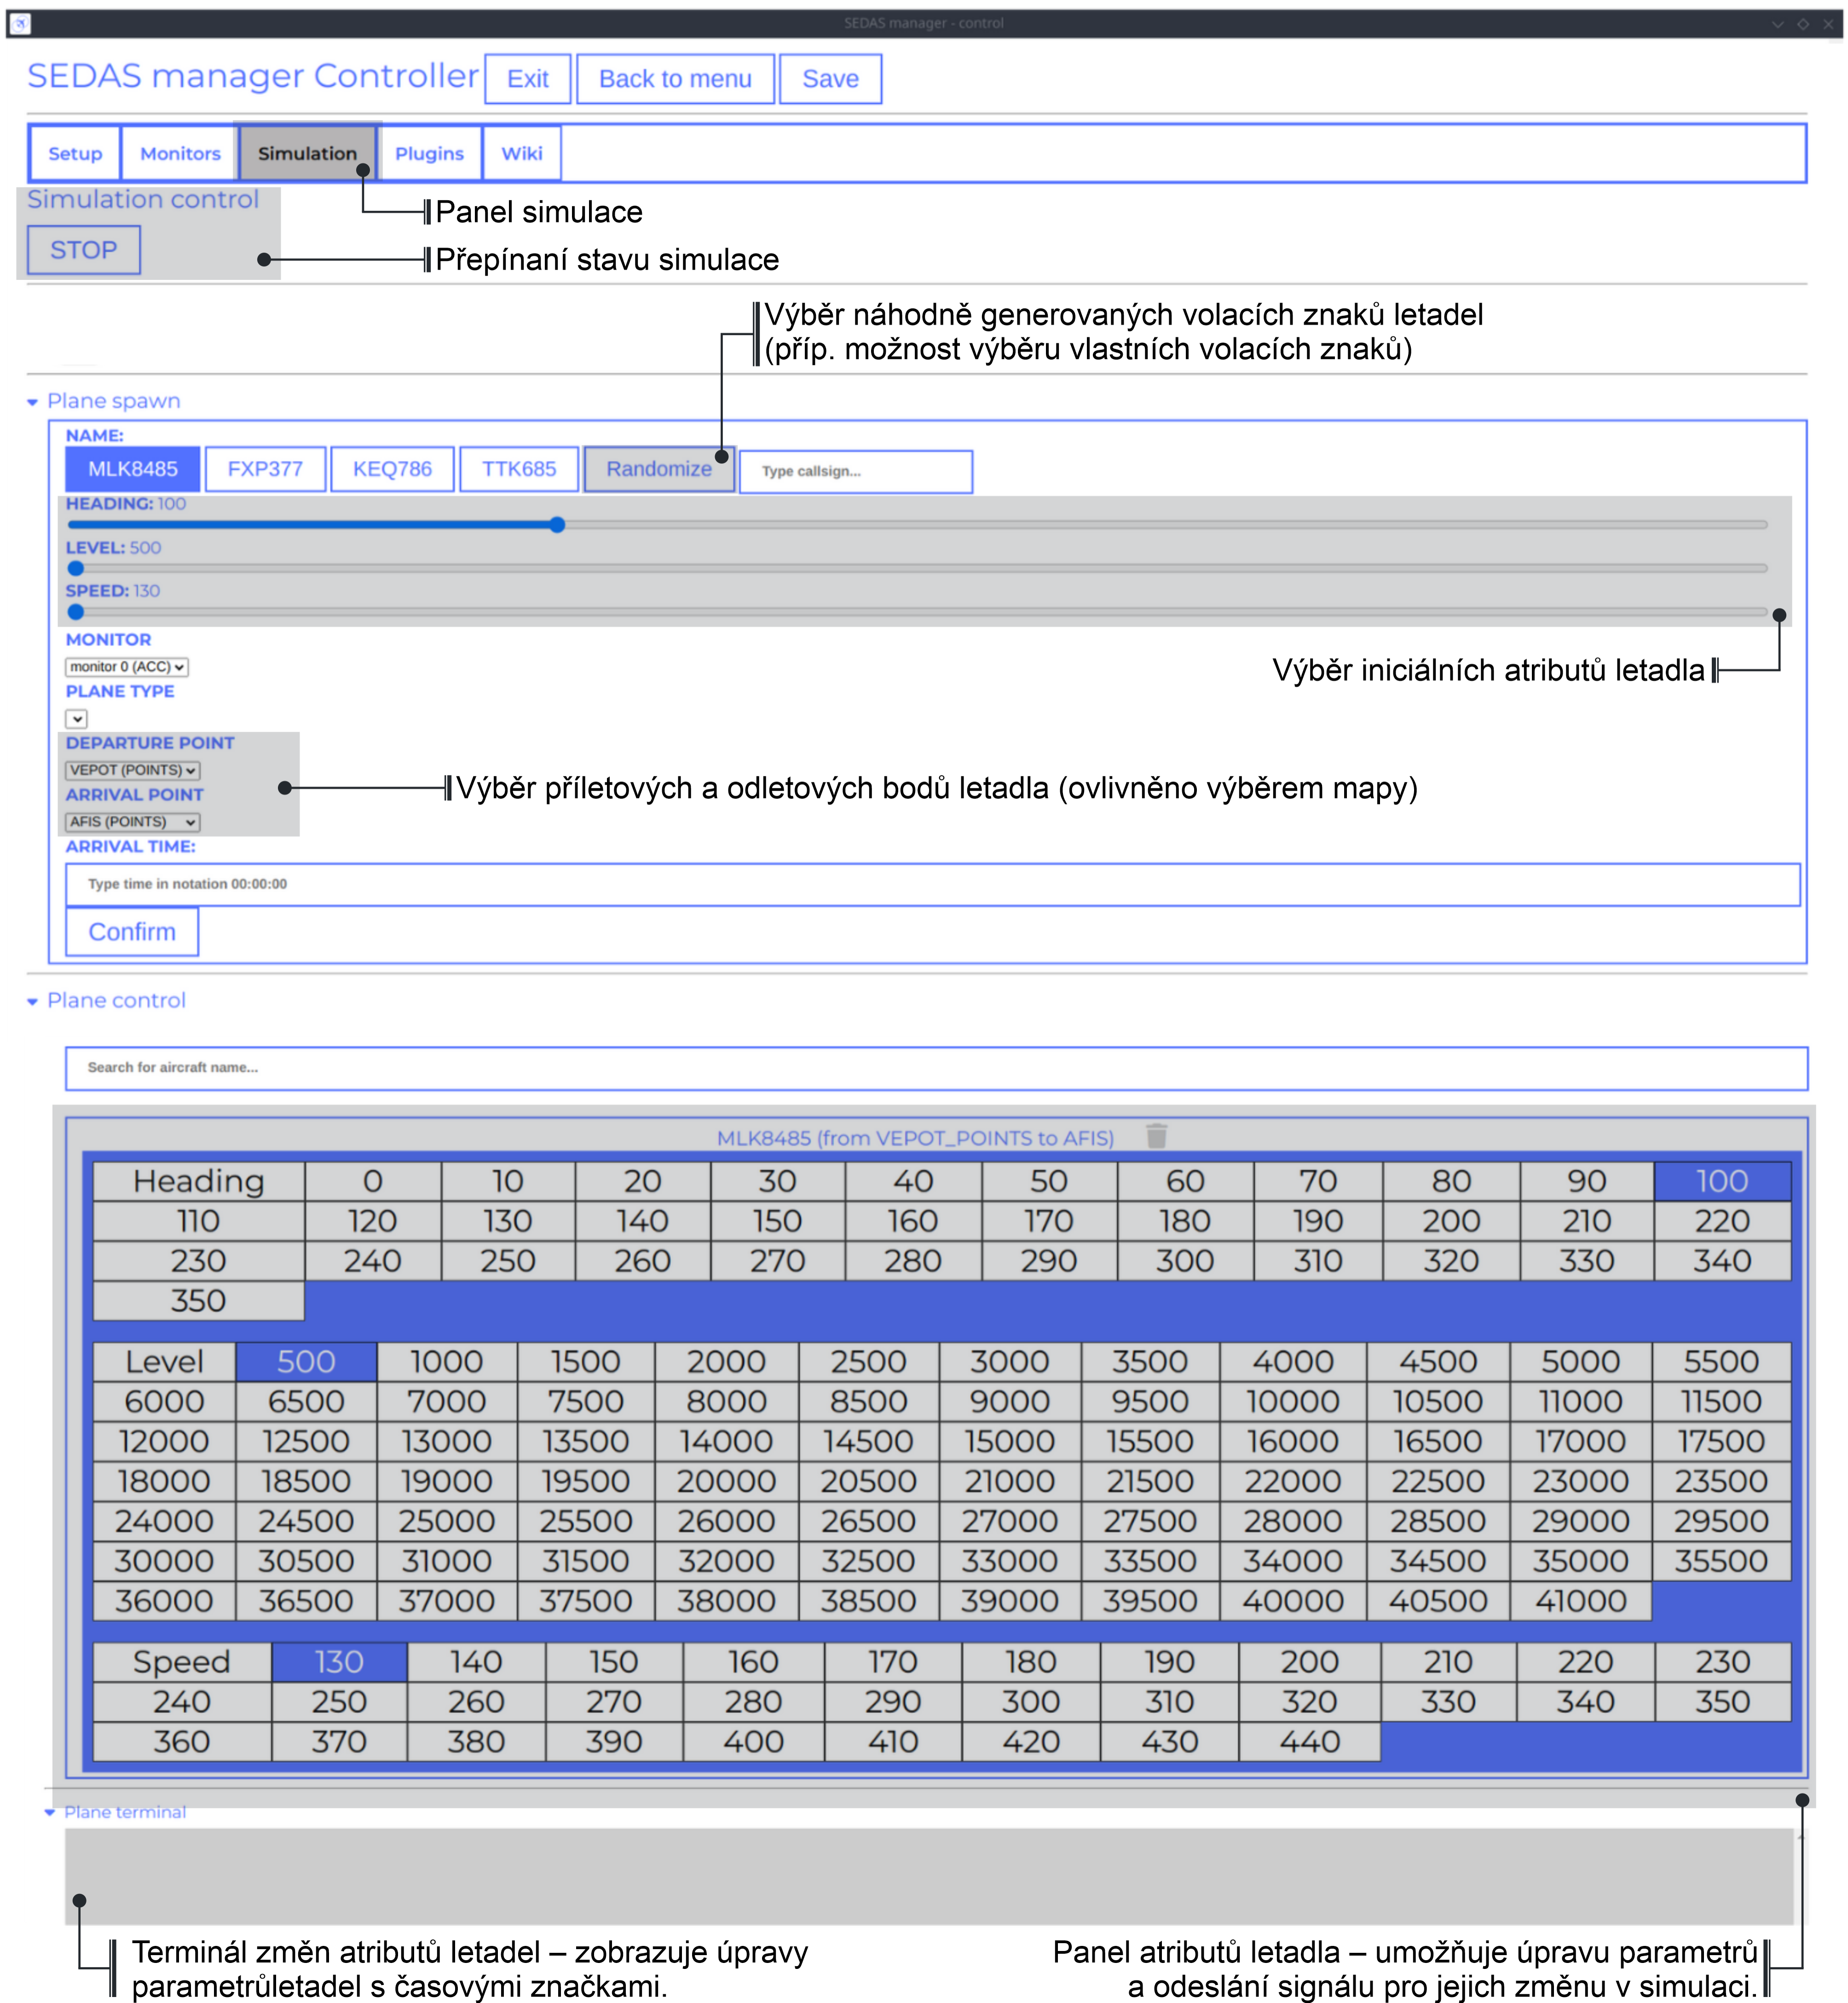
Controller Simulation tab
In the simulation tab, user can control the simulation behavior. This is not really needed in Planned simulations but quite crucial in the Unplanned simulations. At the top, user can control simulation state. Then we have the plane spawning part. There we can set the plane name (random generated or typed) and initial heading, level and speed. We can also designate specific departure and arrival points to the plane.
Note
Options: Plane type and Monitor are not functional yet. They did not present any kind of relevance in the plane simulation setting, so in the future we either remove them or make them functional.
After confirming a plane, the plane will spawn on ATCo window and we will see a new panel opened at the Plane control category. Here, user can control the values of the plane (heading, level and speed). This panel is just for basic correction, it is not needed because its functionality is supplemented by AI pseudopilots (i. e. user controls all the plane variables verbally).
The last part is the plane terminal. Here, user can see all the logs about planes responding to ATCo commands and also heading, level and speech changes made by the plane.
Note
The plugin GUI is not done yet, project needs some reworking of the plugin implementations.

Controller Wiki tab
Simulator is designed for people who are beginners in ATC. Because of that, the Controller window has designated tab only for the documentation. User can switch between SEDAS and IVAO documentation (which also contains interesting data regarding the ATC). There is also a hyperlink to Skybrary at the bottom of the page, which is a reliable ATC source managed by EUROCONTROL.
Worker (ATCo) window
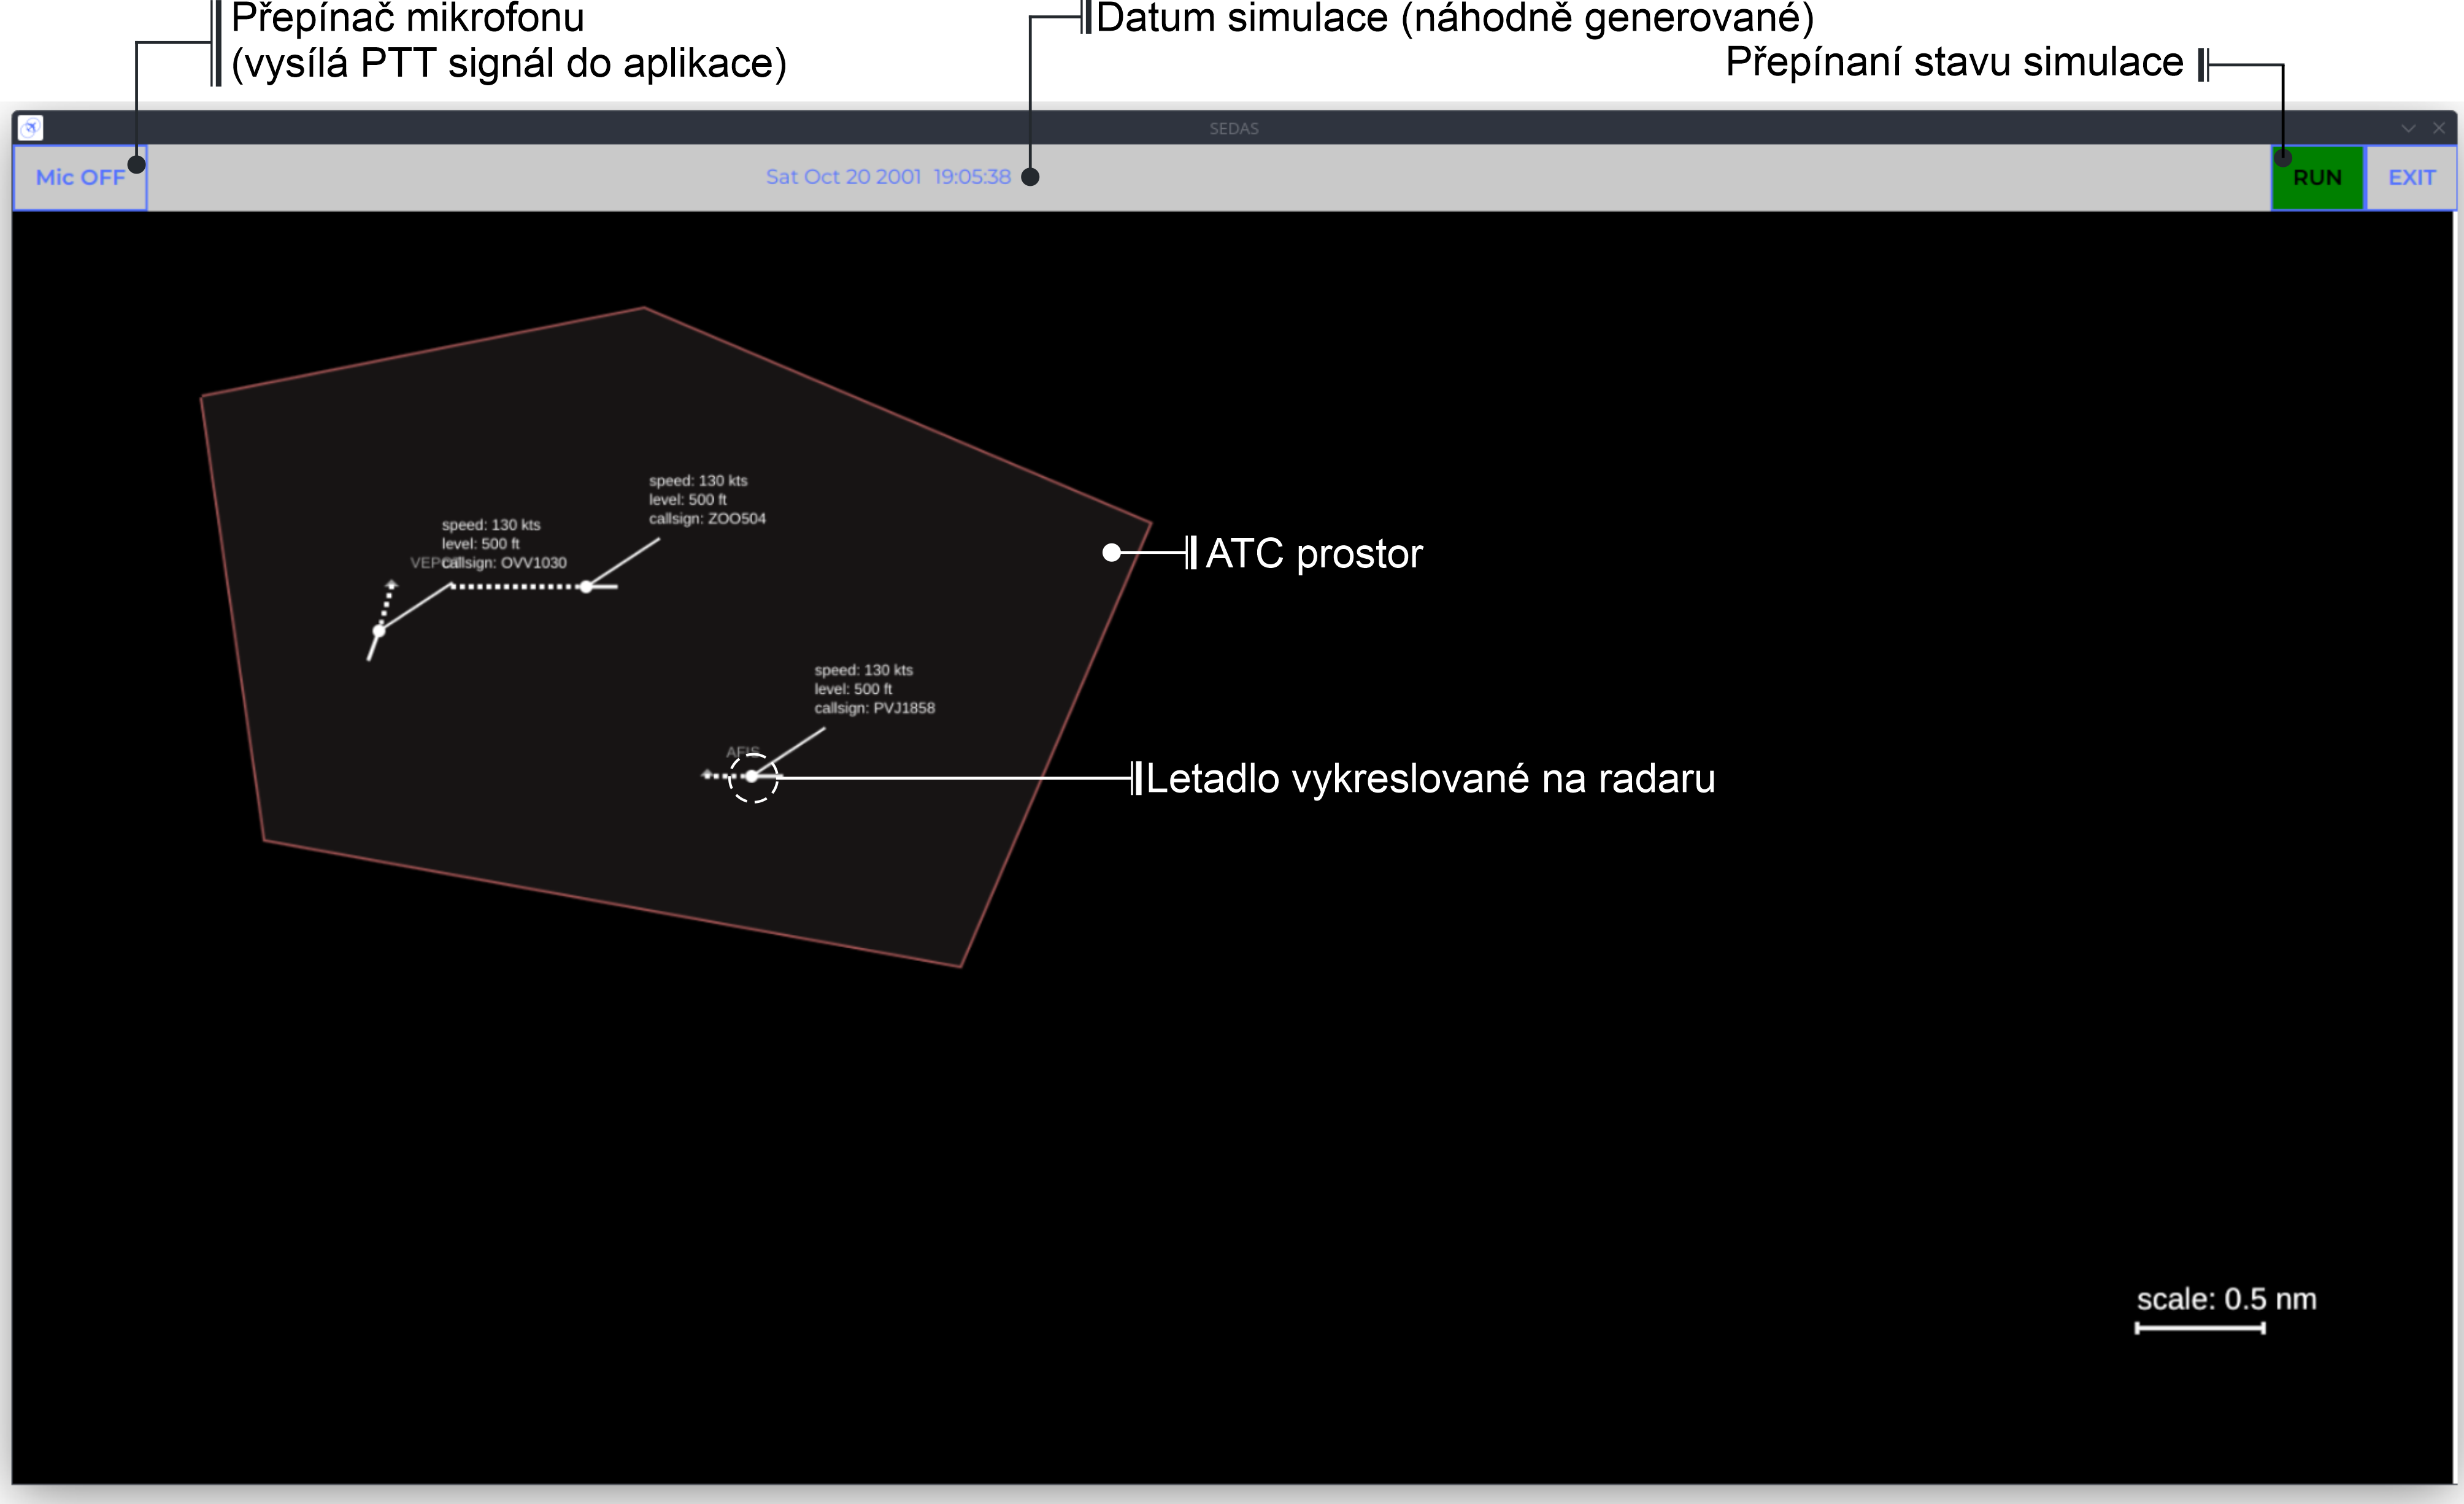
This is the GUI that is visible for the ATCo (Air traffic control officer). The overlay is partly inspired from other simulators as well. On the top is the topnav that contains ATCo actions (microphone output toggle, Date and time of simulation and simulation state switching). Simulator also allows ATCo to exit simulations (so that ATCo doesnt have to drag their mouse to separate window in order to exit app). On the bottom right corner we have the scale, so that ATCo can make some as assumption about the area of the ATM zone. Planes also have dotted paths that indicate their previous location.
Simulation modes
Currently, the app supports two modes of ATC simulations: planned and unplanned simulations. Their purposes and functionalities are explained below.
Planned simulations - For the user, these ones are easier to set up. Only thing user needs to do is setting up the simulation in the Controller window (more specificaly, the setup tab). Here, user specifies map, its corresponding scenario, some adjustments, aircraft presets, command presets and scenario time. After user clicks on the Confirm and setup button, the app starts its environment handler which then sets up all the monitors and also the whole ATC environment. After that, user can just click on the
STARTbutton in the Simulation tab. After that, the simulation is set up and running. (User can then do some small tweaks in the terms of plane handling etc.)Unplanned simulations - Every map supports an empty scenario. When user selects this, while also setting up the rest of presets, and pressing the Confirm and setup button, the app will not start its environment handler, because it detected that there is no scenario available. The only thing it will set up is the map and the rest of presets (aircrafts, commands). So in order to spawn any planes in the user-specified map, user needs to spawn planes manually, which is done in the Simulation tab.
Note
Currently, the app only supports the unplanned simulations scenario, the planned simulation setup mechanism is still in the development.
User-manageable JSON configurations
This is the most used way of changing SEDAS configurations. Fortunately, users do not need to edit the configurations themselves, unless they want a bigger control of the programs behavior. The main app settings could be changed via the graphic interface of the SEDAS settings, that is accessible through the main menu. Still, this chapter lists other configurations and also the settings formatting, so that user can manually intervene into the app functioning.
Note
By default, SEDAS ships some maps in the newly installed package. User can add its own package, but in order to do that,
they need to manually get to the app resources and add the corresponding json file themselves. In the future, SEDAS will have an integrated module for app creation (SEDAS-mapbuilder).
Installing map preset manually
Installing map preset with the help of SEDAS-mapbuilder
Note
Airline presets are not yet implemented in the backend, by now, they do not serve a purpose. But this feature will be implemented next to the planned simulation algorithm and setup. Currenntly, they are not even selectable in the Setup tab because the environment handler is not finished yet, and so because of that, it would basically serve no purpose.
Note
Command presets are not yet implemented in the backend, by now, they do not serve a purpose. But this feature will be implemented next to the planned simulation algorithm and setup.
Note
Plane presets are not yet implemented in the backend, by now, they do not serve a purpose. But this feature will be implemented next to the planned simulation algorithm and setup. By now, the whole simulation calculates the plane physics based on the B737-800 plane (see ATC theory for more info).
Note
Modules and Plugins also have their own configs, but their are managed by the module/plugin itself. The whole module/plugin configuration panel will be available in the next SEDAS version.